Posted on

How to make the crispy Pineapple Bread(如何制作好吃到爆的菠萝包)

One bread ,two texture,it tastes so good!

Ingredients

bread

tbsp = tablespoon, tsp=teaspoon

5 1/2 cup    bread flour (I use Costco HARVEST BREAD FLOUR)

1/3 cup       mash-potato (secret ingredient to keep the bread soft and moist)

1 cup           granulated sugar

3 tbsp          vegetable oil

1/2 tsp         salt

3 tsp            yeast

11/2 cup      milk (warm)

1 tbsp          sweetened condensed milk

3                  large eggs

8 tbsp          butter (softened at room temperature)

Topping

8 tbsp       butter (softened at room temperature)

1/3 cup       sugar powder

1             whole egg liquid

1/2  cup        light baking(cake ) floure

2 tbsp            dry milk powder

1 tsp               baking powder

Steps:

Step 1: Put all the ingredients, except butter, in the KITCHEN AID mixer bowl, use speed 1 and stir for about 10 minutes, then use speed 2 and stir until the dough can be stretch into a thin film (see picture 1). The dough should

be very soft, elastic, and a little bit sticky.

Step 2: Slice the butter into pieces, put into the mixer  bowl, keep stirring the dough till smooth and shiny.

Step 3: Cover the dough and put it in a warm place, until it become twice in size.Put the dough on a smooth counter top ,relive the air out from the dough ,divide the it into 12 small round dough evenly,let it relax for about 15 minutes,at the same time  we prepare the topping ,

Step 4:Mix the soften butter and sugar powder together in another bowl thoroughly ,it will be very sticky ,so you’d better wear a latex  disposable  glove.then add the 1/2 egg liquid,stir the mixer , add the flour and  dry milk ,bake powder, continue it become another sticky dough,put it into refrigerate for 5 minutes .

step 5: Take out the topping dough from refrigerate ,divide it into 12 smaller dough evenly ,use a rolling pin stretch and spread into a piece of round thin dough,put it on the previous round  bread dough top,just like a cap.put them on a tray.

step 6:Put the tray in a warm place ,until them become twice in size,use a clean brush ,brush the left 1/2 egg liquid on the top of them(it’s called EGG SHINE),you can drop some sesame on the bread top.

step 7: Set the oven to 350,bake them for 20 minutes

Now cool it ,enjoy it with a cup of coffee,you won’t be regret!


Posted on

Basic chiffon cake (零失败基础戚风蛋糕)

I love the soft and light texture chiffon cake so much ,tried many recipes  ,but some time success,some time the result made me fussy and mad(in Chinese the ANGRY TO MAD is the same sound of CHIFFON)  .If you have made a chiffon cake you should know what I  talk about—the cake never growing up ,or even growing up ,after cooling it ,the cake become much shorter than just taking  out from oven ,the outside is very dry ,but inside is still very wet.

One of my best friend Grace ,who is also a good homemade baker,told me to try her recipe which wrote by herself in Chinese(中文原方子https://www.xiachufang.com/recipe/102208842/). After a while ,I deiced to try today.The  chiffon cake really makes my day!When I touched the top of it,the rustling sound made me so excited ,it means I’m successful this time. then I can’t wait to share the recipe now:

Ingredients

1. 8 large eggs

2 .sugar (egg white)    3/4 cup

sugar(egg yolks)      1/4 cup

3. vegetable oil             1/2 cup

4. milk                           1/2 cup

5 extract vanilla               1tsp

6  cake baking flour      1 cup( 1/3 cup coco powder instead of flour if you want to make a chocolate flavor cake)

7.  white vinegar           1tsp


Instruction

1.Preheat the oven to 300 F(this is the most important secret ,lower temperature than most recipes),prepare two 9 inches round cake pan,you can also    choose a rectangle pan or other shapes you want;

2. Separate the egg white and yolk carefully into two different big mix bowl.

3. Add another 1/4 cup sugar into the egg yolk bowl,beat egg yolk until smooth and light,then add oil,,vanilla and milk,mixing evenly ,add shifted flour, stir and folding carefully,until the mixer very smooth ,don’t beat the flour mixer. set aside

4. Put the white vinegar into the egg white mix bowl,add 1/4 cup sugar,Beat the egg white with high speed mixer for about 3 minutes ,then add another 1/4 cup sugar, then beat for another 3 minutes,add the last 1/4 cup sugar, beat the egg white mixer can stand peak stiff ,set aside;

5.Using a rubber spatula,Folding the half egg whites into the flour mixer carefully until evenly incorporated,pour        the batter into the remain egg whites bowl , just combined and no large  white streaks remain.

6.Pour the batter into the two prepared pans,shaking on the table let the air bubble release.Then put the pans         into preheated oven ,baking for 45 minutes.You will see the cake growing very well.

7.Take out them from oven ,totally cooling them upside down ,use a thin knife going through the whole edge of the pan  ,get the cake out from the pan,then you can slice the cakes into pieces ,decorating it as your desiring.


Posted on 1 Comment

Pulled Pork, easy like Sunday morning

Pulled pork is one of my favorite American (Southern) food. The first time I tasted the pulled pork is in our HOA annual “Pig Pickin'” party, a few years back. Neighbors brought home style side dishes, salads, and dessert to the party. And the star is the most delicious smoked pulled pork. The cooks (also our neighbors) arrived early in the morning, and setup the smoker in our community park. A commercial tow-behind grill is what normally used to cook the pork. They prepare about 5-6 Boston butt the day before, covered with dry rubs. In the early morning, they set the grill to low temperature, put the “butt” on the grill, let them cook 6-8 hours. “Low and slow” is the secret to make the super flavorful, tender, and juicy pulled pork. When it’s done, the bone in the “butt” can be easily pulled out. The meat is fork tender, moist, covered by a thin layer of “bark”. The cooks then used a pair of fork to shred the meat into small pieces. The dripping from the meat is collected and boiled with a little bit vinegar, mustard, and pepper to make the sauce. You can make sandwiches with the pulled pork, or just get a plateful of the juicy, tender, smoky meat, and enjoy it with a big cup of cold sweet ice tea.

To make the best pulled pork, there are three most important things to take care. The dry rub, the temperature, and a couple of cold beers. Every cook has his/her own dry rub recipe, which makes their unique flavor. The grill temperature is mostly in the neighborhood of  220 F and 260 F, and the internal temperature of the thickest part should reach 190 F when taken out of the grill. You need a lot of patience waiting for the pork to cook. So you can just leave it alone, go mow the lawn, then sitting in your favorite lawn chair, open a cold beer or two, enjoy the easy Sunday morning.

Today, I’ll show you how I made the Chinese seasoning pulled pork, featured in our most Supper Club party. I like the traditional Southern style dry rub, but I also like the Hunan bacon (腊肉) seasoning, which is simply salt, Sichuan pepper, and the herbs of your choice. I think the low and slow smoking process is similar to making the Hunan bacon. I have been experimenting with the pulled pork seasoning, and resulted in the following recipe:

Recipe

1                  Boston Butt (medium size is easier to handle, about 6-7 lbs)

1/2 cup       sea salt

3 tsp           Sichuan pepper (depends on how much you like it, you can adjust the amount)

3 tsp          black pepper

4-5             star anise

1 tsp          cumin seed

1/2 tsp       clove

1/2 cup      brown sugar

Cooking Instruction (TL;DR. version)

Grill/Smoker 220F-260F, ~1.5 hours/lbs meat, 4 hours covered, open after till internal temperature reaches 190 F

Rest 1 hour before carving


Cooking Instruction (Full version)

Use a blender to chop and mix the salt and seasonings, I normally don’t put the brown sugar in the blender, so it won’t get sticky. You should get about 1 cup of the dry rub. Be creative, add hot chili pepper if you want it spicy, add cinnamon stick if you like the flavor. The Boston butt is such a big chunk of meat, you’d rather prepare more rub than needed, which you can always use later.

Now rub the seasoning all over the Boston butt, on both sides and both ends. Some people like to trim the fat cap, I like to keep it on the meat. The melted fat infuse with all the spices flavor, makes the meat more tasty. Because we are going to use low temperature,  cook very long time, most of the fat will drip away eventually, so I don’t worry too much. You shouldn’t either, how many time you are going to cook this in a year? 😉

Put the seasoned Boston butt in a aluminum foil pan,  loosely cover with a large piece aluminum foil. Put the pan in refrigerator overnight, or at least 3-4 hours. The longer time you seasoned it, deeper the flavor goes into the meat. Take it out of the refrigerator the next morning, you may find some water dripped in the pan. Take the meat out, wash the pan, and put a small wire rack in the pan, and put the meat back in the pan, on the rack. The rack keeps the meat from the dripping during cooking. Cover the meat with the aluminum foil, tightly seal the edges.

Now prepare the grill. I learned from youtube videos to make a “snake” of charcoal briquettes. Then you put a few hot burning briquettes on one end of the snake, let it burning slowly towards the other end. You can control the speed of charcoal burning by putting more or less briquettes along the “body” of the “snake”. Combined with controlling the opening of the vents on the grill cover, you can control the temperature at a pretty precise level. Plus, you can just leave it alone, the briquettes in the picture lasted about 4 hours. Keep checking the temperature on the thermometer, adjust the vent so the temperature stabilizes a little bit over 200 F. Now place the pan with the meat on the grill. The temperature will rise a little bit more after 30-40 minutes, keep it below 260 F. Don’t worry if the temperature went too high for a short time, the foil pan will keep the moisture inside, so the temperature and climate inside the pan has a little more tolerance than just put the meat on the grill.

Don’t frequently open the grill to check the temperature. Some people say every time you open the cover, you need add another 15-20 minutes to the cooking time. So leave it alone!!! Let the meat transform on its own. You can obviously use a remote reading thermometer to keep checking the internal temperature. When the temperature rises to 160 F, collagen inside the meat started melting, and turn into gelatin. This makes the meat tender, moist, and flavorful. This is also what happens during the making of braised pork. But if the temperature got too high, the muscle fiber shrank too much and squeeze the juice out of meat, meat became dry and hard.

Some instructions say 1.5 hours per pound at 225 F, or 1 hour per pound at 280 F. For the 6 lbs meat I was cooking, I estimated a good 6-8 hours at temperature between 220 F and 260 F. I let it run the first 4 hours without opening the cover, until the charcoal almost burn out, then I took the pan out, setup another charcoal snake in the grill, and put the pan back in there. This time, I open the aluminum foil cover and let the smoke get in touch with the meat. Use whatever wood chip you like to make the smoke on the charcoal. After 4 hours of cooking, the meat already smell really good. Fat started dripping into the pan, and the seasoning is going inside the meat.

I checked the temperature of the meat more often in the next two hours. The goal was to achieve a internal temperature of 190 F. Just for the peace of mind, the USDA safe cooking chart recommended 145 F internal temperature for pork. At 190 F the collagen and fat are perfectly melted, so you will have the most amazing piece of meat through out.

When it’s done, take it out of the grill and rest in the pan for another 45 minutes ~ 1 hour, covered in the aluminum foil. Now the bone can be easily pulled out, and you can start slicing the pork.

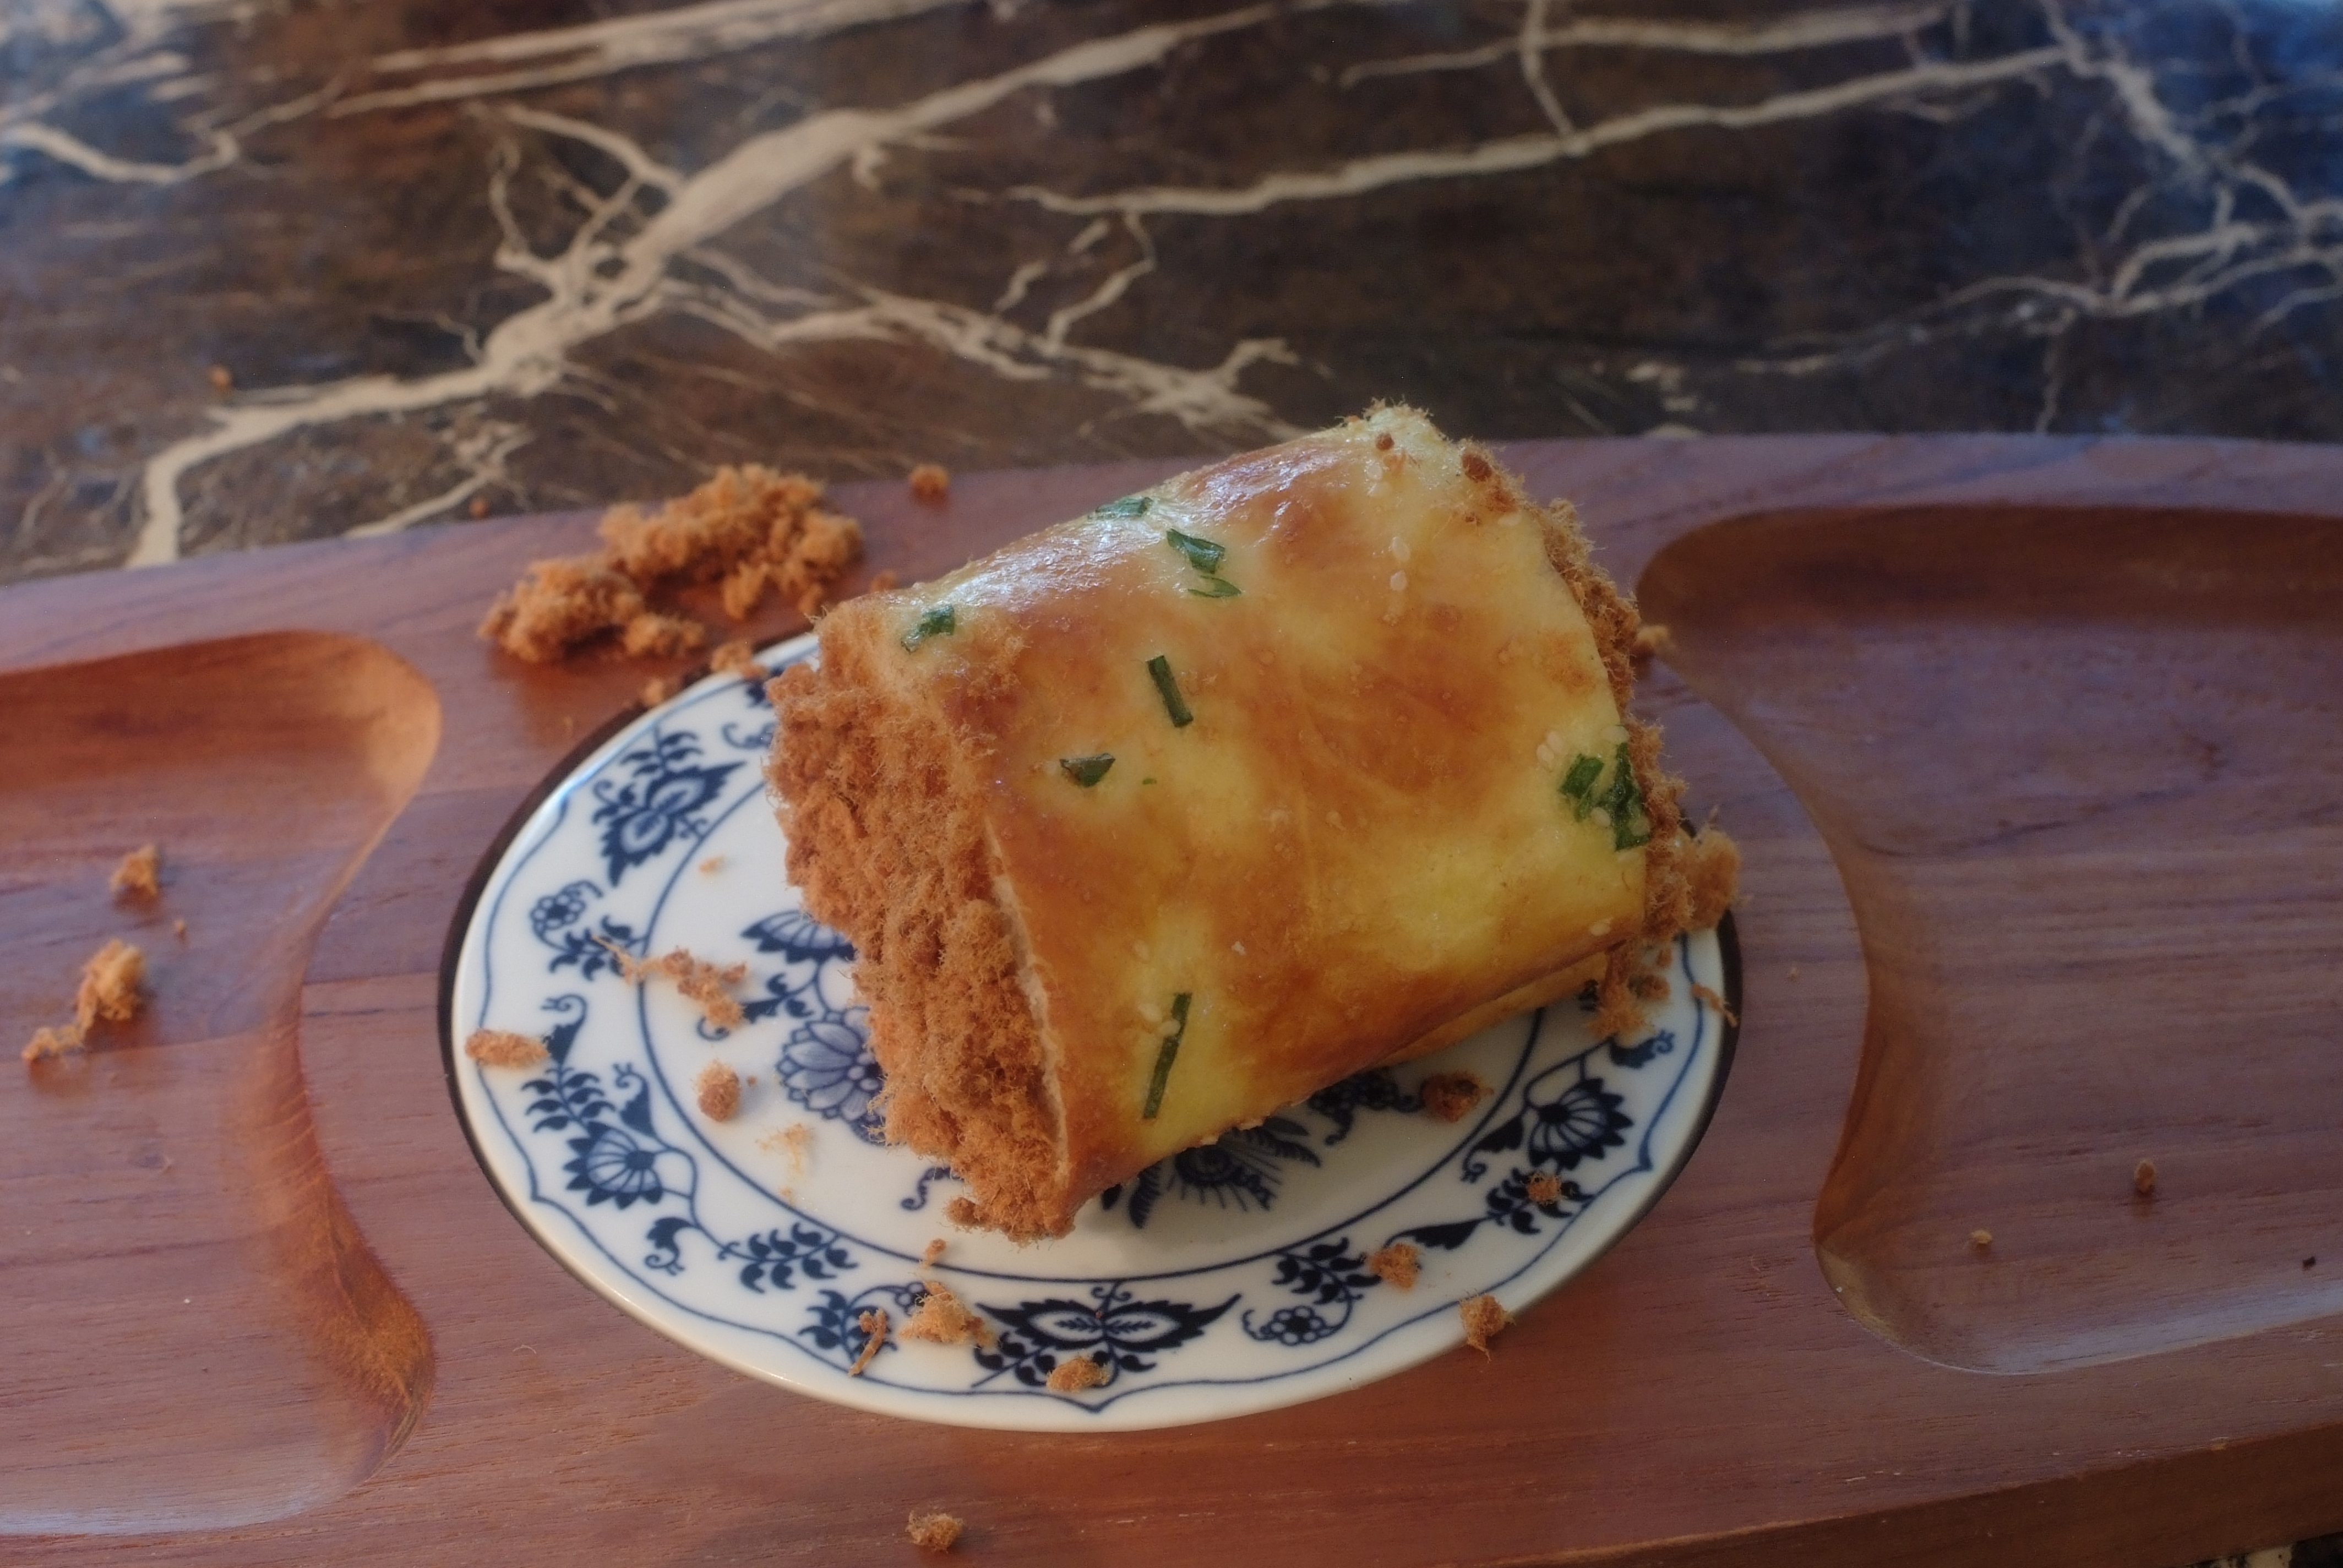
I didn’t have enough time this time, so the center of the meat is still a little chewy. You can still see some fibrous meat in the center of the cut. but the outer part of the meat is so tender and succulent. Knife slices through it like cutting butter. The fatty gelatin part just melted in my mouth.  I’m not saying the dish I presented to the party is not good. I’m saying the meat was so much better when I carved it and shared with my son :). He’s always been my best company cooking and cutting all kinds of meat on the grill. That’s why I encourage everyone to cook your own Boston butt, because it tastes the best on the chopping board, and the moment you enjoy it with your family and kids is priceless.

Happy grilling!

CH

Posted on 2 Comments

Columbia ChiHe Club meet 2(哥村吃喝团第二次聚会盛况直播)

I must write this blog in Chinese ,only this language can exactly express how deeply  I love these foods and people  !If you don’t recognize Chinese,please ignore the words,just enjoy the pictures …


初秋细雨绵绵的周日,这样的日子总会带给身在异乡的我们一丝淡淡的乡愁,在jihao团长的精心筹划下,Emmarou的鼎力协调场地下,全团成员各显身手,真是把吃喝团的聚会推上一个新高度!先给大家看看这个华丽大气的会所,再来一张我们团员的集体照(在美食的诱惑下,能把这一大帮人叫出来拍照,真是费尽死了,哈哈)注意!下面开始放大招了啊~~~来个菜的全景(甜点,水果一边呆着先)


开始上菜了,这次相比上次更有经验,大家都准备了自己的菜名,而且小资的Angle还带来了家里的摆设,真是锦上添花:(排名不分先后)

来自jihao团长,果然团长不负团长之名!


平时连厨房门都摸不着的“宁”也是为了聚会拿出学霸精神,捧着书现学,成果也很喜人!


首次参加我们聚会的haihong,给我们带来的她的好手艺,人家可是曾经参加过美食大赛,作为特邀评委:

“美事共享”群主Daisy 也带来了她的拿手菜和甜点:

爱开玩笑的“一日一恶”不仅笑话讲得好,菜也做得棒,他家领导的八宝饭也是一流:

小资的Angle连做饭都是这调调,模样好,味道清淡

本次聚会最文采菜名非“秦小样”莫属:

juan带来的珍珠丸子和香菇青菜在这酒肉横生的菜肴中简直就是一缕清泉:

川菜大师“xiaoyaomom”的菜真是妙光,等我回头一看已经见底了:

东道主Emmar真是不容易,身上挂着个树袋熊,忙前忙后,还不忘准备好吃的东西:

赵琳的水晶肘子也是大受欢迎,完全是真人不露相,平时到处嚷嚷要去人家蹭饭的人,新人Heidi的大肉包子是孩子们的最爱:


最新加入的“Ma G H”真是太积极,为了这次聚会做了一天的饭,饺子真是做得馅儿大皮薄,老公的红烧肉也是让人回味无穷:

其实聚会最欢乐的还是这帮小朋友们,有得吃有得玩,就跟去了游园会,更重要的是让他们能够从小懂得享受美食是人生的一大快乐,我估计回家孩子们都是秒睡,特别感谢Angle的face painting station,Scoot 的烤棉花糖,Jack的棉花糖机

再次感谢团员们的倾力贡献,聚会仅仅是预热阶段,后面我相信还有更多更高水准的朋友加入!哥村的生活将因为你们而变得充满亲情,丰富多彩,日新月异!

Posted on

How to make the pork sung bread roll(怎么制作肉松面包卷)

I believe many people have the experience like mine: it’s very difficult to find the soft and buttery bread in your everyday American grocery stores, and its impossible to find the delicious pork sung bread roll in the whole Columbia area. The closest place I found that makes it is one of the Asian supermarket in Charlotte. How to satisfy my craving for the delicious pork sung bread roll? We tried many times at home, and finally find the following recipe that we believe everyone can follow.

First step, very important, is to bake the super soft bread sheet. I used a french brioche bread recipe ( original recipe was posted by 熊猫媳妇 on wenxuecity.com), practiced and adjusted several times, finally got a perfect recipe to make 20-24 rolls in one batch:

Ingredients(bread)

tbsp = tablespoon, tsp=teaspoon

5 1/2 cup    bread flour (I use Costco HARVEST BREAD FLOUR)

1/3 cup       mash-potato (secret ingredient to keep the bread soft and moist)

1 cup           granulated sugar

3 tbsp          vegetable oil

1/2 tsp         salt

3 tsp            yeast

11/2 cup      milk (warm)

1 tbsp          sweetened condensed milk

3                  large eggs

8 tbsp          butter (softened at room temperature)

Stuffing

Japanese Mayonnaise and pork sung (you can find these from Asian grocery market) 

Steps:

Step 1: Put all the ingredients, except butter, in the KITCHEN AID mixer bowl, use speed 1 and stir for about 10 minutes, then use speed 2 and stir until the dough can be stretch into a thin film (see picture 1). The dough should be very soft, elastic, and a little bit sticky.

Step 2: Slice the butter into pieces, put into the mixer  bowl, keep stirring the dough till smooth and shiny.

Step 3: Cover the dough and put it in a warm place, until it become twice in size. Now, you can use the dough to bake any kind of soft bread you desire. Here, we continue to make the pork sung bread roll. Divide the dough into 4 smaller pieces, stretch each piece into a big baking pan. Use a rolling pin and your hand to stretch and spread it into a big dough sheet. Cover the pan with plastic wrap and put in a warm place again, for about another hour, until the dough sheet become twice thick.

Step 4: Preheat the oven to 350F. Punch a lot of tiny holes with a fork or toothpick. This is to avoid big air bubbles under the dough sheet. Beat 2 eggs (chop some green onion and mix with the egg if you like),  brush gently and evenly over the top of the dough sheet (spread some sesame if you like). The dough sheet is very soft and fragile, so be careful!

Step 5: Put the pan on the middle rack of the oven, bake at 350F for 15 minutes. Take it out when the surface is beautiful golden, and light brow in color. I managed to bake two sheets at a time. Swap position at the end to make both sheets nice colors. Cool the bread sheet in the pan.

Step 6: Now we wrap the bread sheet with mayonnaise and pork sung. If you have experience making sushi rolls, this is not much different. Make sure the bread sheet is cooled to room temperature, such the mayonnaise will not melt on the bread sheet.

Lay a large piece of plastic wrap on the cutting board, put the bread sheet upside-down on the plastic wrap. Spread mayonnaise and pork sung on the bread sheet. I make my mayonnaise at home with egg yolk, vegetable oil, and lemon juice, tastes the best. But you can also use the Japanese mayonnaise bought from Asian grocery store. Gently and gradually roll the bread sheet over. The plastic wrap helps to prevent large cracks in the bread sheet. Small cracks during the roll is totally normal. Use the plastic wrap to tightly wrap the bread roll, and put in a refrigerator for at least one hour.

To serve it, slice into pieces  you desired, re-heat it in a microwave oven for  5-10 seconds; brush both ends with mayonnaise and pork sung. Now enjoy it with your families and friends.

Hope the delicious roll can re-live your beautiful memories.